 supplies: Rose Red, Whisper White & Kiwi Kiss cardstock (no longer available), Raspberry Tart DSP, Regal Rose 5/8" Grosgrain Ribbon, Rose Red Stampin' Ink.
I found the idea for this cute basket at Elaine's Creations, she is a very talented fellow SU!demonstrator. So here's my tutorial on how to make this basket. When you click on the name of the product that is highlighted a different color, it will take you to the page in the online catalog, to see what that product looks like or to order it online if you'd like to!
 Pic A
Pic A Pic B
Pic B
(where I'm pointing in Pic B is where the 3/8" mark is~directly half way between the 1/4" mark & the 1/2" mark~see next step below)
2. Now with the 5.5" side at the top, using the 2nd 8.5 x 5.5 piece of cardstock score at 3/8". Then turn the sheet around & do the score on the opposite side.
Tip: I like to score with my Bone Folder. I've used the scoring blade for my cutter & most of the time it just cuts through my paper, so I have learned to love the bone folder & it's great to have one more use for this handy tool as well. It's a little awkward to get used to at first, but once you get used to it you may never want to go back.
 Pic C
Pic C
3. Next with the 8.5" side at the top, score 2-3/4" from the edge on the short side (see Pic C). Then turn your cardstock around & score the same on the opposite side.
 Pic D
Pic D
Your cardstock should now look like Pic D
 Pic E
Pic E
4. Now fold all the of scored lines in & make a nice crease.
 Pic F
Pic F Pic G
Pic G
5. Using Snips, on the short ends (see Pic F) snip the four corners into the score line so that you can fold the box easier (see Pic G).
Tip: I highly recommend Stampin' Up!'s Snips. They are so sharp, cut more precise & are small enough to get into tiny spaces. They are the best pair of paper scissors I've ever owned.
 Pic H
Pic H
6. Adhere Sticky Strip to the sides & bottom of each basket end piece as shown in Pic H.
Tip: It is very important to use something stronger than regualar Snail or Tombow Adhesive, like the Sticky Strip, to adhere the sides of this basket (or any basket or box). Regular tape adhesive will not hold together for long on a project like this.
 Pic I
Pic I Pic J
Pic J Pic K
Pic K
9. Next pull the red film off of one side piece & line it up with the side of the box & adhere (see pic K). Repeat on the other side.
 Pic L
Pic L
 Pic M
Pic M
10. Your box is assembled, Pic L & M is what it should look like.

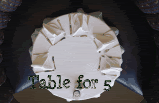
Pic N
11. (I'm sorry I forgot to take a picture of this part). Punch out the Scallop Circle & apply adhesive around the outside edge of it. Adhere to the side right over the oval that is already punched out there. Tip: turn your punch over so you can see exactly what you're punching.
12. Next, using the 1-1/4" Circle Punch, turn your punch over so you can see the funny shaped oval inside the circle & punch it out (centering the oval in the circle). Add ribbon to one or both sides (as shown in Pic N).
 Pic O (that flowere is from the Baskets & Blooms die cut that I cut the sides out with)
13. You can decorate this anyway you'd like, but this is what I did. Cut the side pieces. The inside piece (chocolate print) measures 3-3/4" x 2". I used the Bella Rose DSP for this inside piece.
The red layer measures 4" x 2-1/4". Next punch the corners using the Ticket Corner Punch. Then adhere each piece together.
I also used the Large Oval Punch, the Scallop Oval Punch, the Great Friend Stamp Set, Riding Hood Red Striped Grosgrain Ribbon, Chocolate Chip & Pink Pirouette cardstock, Chocolate Chip & Riding Hood Red inks. If you have any questions about this tutorial or any products, please feel free to contact me at : chelstamps (at) yahoo (dot) com.

To order 24/7 click here!


No comments:
Post a Comment